Page 5 of 257
Re: 55HG98. Para Recce Rebuild.
Posted: Fri Aug 16, 2013 10:19 am
by dave4499
Hi Neil,
What model of sander did you buy?
I have to buy one now my shed has been built, no more excuses

Re: 55HG98. Para Recce Rebuild.
Posted: Fri Aug 16, 2013 10:28 am
by AR4412
Morning Dave,
Glad you've got your 'man-shed' built.

I bought a Clarke CROS1 from Machine Mart, only £33 but it seems to do the job well. I only used one disc on each wing and the discs are a good price too, £2.39 for a pack of five.
Regards,
Re: 55HG98. Para Recce Rebuild.
Posted: Fri Aug 16, 2013 10:39 am
by AR4412
Tinweasel wrote:I was thinking somwhere like BATHUS in Canada or somewhere that used sand or sand and green for opposition forces, I have put a couple of feelers out but I doubt I manage to find anything
Hi Shaun,
BATUS has it's own fleet of vehicles that exercising troops take over on arrival, saves on the transportation costs. When I was last in BATUS playing enemy, the exercising troops vehicles were green and yellow and the 'OPFOR' (Opposing Forces, aka Enemy) vehicles were a crazy pinkish colour with a green/red oxide-ish camouflage pattern sprayed over it.
Took me ages to find pictures of them on the web as I couldn't find the photo's I took while there.

- Salamander2.jpg (26.72 KiB) Viewed 2587 times

- App0459.jpg (30.4 KiB) Viewed 2587 times
Probably all changed once Canada started being used to train troops for Afghan and the fleet changed to reflect the kit used over there.
Regards,
Re: 55HG98. Para Recce Rebuild.
Posted: Fri Aug 16, 2013 11:06 am
by dave4499
AR4412 wrote:Morning Dave,
Glad you've got your 'man-shed' built.
I bought a Clarke CROS1 from Machine Mart, only £33 but it seems to do the job well. I only used one disc on each wing and the discs are a good price too, £2.39 for a pack of five.
Regards,
Thanks Neil.
Re: 55HG98. Para Recce Rebuild.
Posted: Sun Aug 18, 2013 6:55 pm
by AR4412
Project time has been a bit short this weekend due to other commitments.

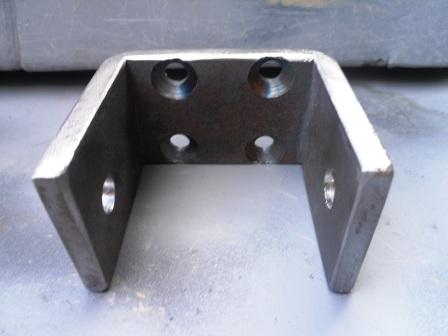
But I did grab an hour earlier and make this.
- SAM_0884.JPG (28.01 KiB) Viewed 2564 times
Its one of the Recce rear stowage frame securing brackets. Only one was fitted to the vehicle on the right side, the other having been removed to make space for the number plate. Not having any 40mm bar, or the means to heat it up to bend it, this was made from three pieces of 50mm bar welded together and cut down to size.
Here it is next to the original one that was fitted.

- SAM_0885.JPG (28.61 KiB) Viewed 2564 times
Not a big update but it's a little bit more done.

It will be a while before it gets fitted so I'd best go and put it somewhere safe for now.
Regards,
Re: 55HG98. Para Recce Rebuild.
Posted: Tue Aug 20, 2013 11:39 am
by AR4412
I've been having a play with the MIG this morning and practicing welding aluminium ready to tackle some repairs on the bonnet where the spot welds have let go. I don't think it's as hard as some make out once you get the set up right but does take some practice. Tack welding to re-create spot welds is fairly easy and during my practicing I didn't blow through the bottom sheet once. Beginners luck maybe?
I've found it works better if you clamp a piece of steel to the rear of the work piece to act as a heatsink, especially if you want to do a weld run. If running a weld along a butt joint I've found its best to work in short runs. When I tried a longer run the heat build up in the aluminium causes problems and after about four inches of welding and I began to blow holes as the aluminium began to buckle and moved away from the heatsink, and the tack welds I put in further along the joint let go. I think I should have doubled the size of the tacks I used. You do need to move the torch at about double the speed you would for MIG welding steel and I found it best to have a bit more wire sticking out of the torch than you would do normally to stop it melting back up to the nozzle tip and clogging it.
I feel confident enough to repair the spot welds on the bonnet but I think I'll practice a bit more on running in welds before I attempt any on the motor itself. (Like the one in the tubs side panel.)
I hope this info is useful to someone who needs to repair cracked panels or popped spot welds.
Regards,
Re: 55HG98. Para Recce Rebuild.
Posted: Tue Aug 20, 2013 1:39 pm
by Gordon Bennett
Nice bracket Neil and am following your welding prowess with great interest as i'll undoubtably have some to do.
Pretty handy with a Mig, but never done ally before

Re: 55HG98. Para Recce Rebuild.
Posted: Tue Aug 20, 2013 1:57 pm
by Tinweasel
Gordon Bennett wrote: am following your welding prowess with great interest as i'll undoubtably have some to do.
Pretty handy with a Mig, but never done ally before
If anyone wants some practice I have a couple of patches that need sorting in my tub

Re: 55HG98. Para Recce Rebuild.
Posted: Tue Aug 20, 2013 7:41 pm
by AR4412
Gordon Bennett wrote:Nice bracket Neil and am following your welding prowess with great interest as i'll undoubtably have some to do.
Pretty handy with a Mig, but never done ally before
It might be a couple of days until the next update mate as I've just buggered the torches swan neck during a practice session.


AR4412 wrote: .....I found it best to have a bit more wire sticking out of the torch than you would do normally to stop it melting back up to the nozzle tip and clogging it.
I've just found out that a 'birdsnest' stopping the wire feed mid run will cause the aluminium wire to melt up to the welding tip, causing it to melt and deform. This means you cannot remove the shroud to remove the melted tip from the swan neck. I did get the tip out after a bit of faffing around with a drill, but the swan neck is slightly bent and there's a crack in the threaded end so a new tip won't screw in. Bum!

Looking at the wire I removed it was scored along it's length where it had fed through the steel wire liner, so along with the new swan neck and shroud I will fit a teflon wire liner.
It's a learning curve and apart from that little misshap the aluminium welding is coming on.
I'll order the new bits, (and some spares), tomorrow and they should be with me sometime Thursday, then I'll be back in the game.
Regards,
Re: 55HG98. Para Recce Rebuild.
Posted: Tue Aug 20, 2013 8:15 pm
by danster
dont know if you saw the june issue of LROI they had an article on alloy welding with a mig and said to use a plastic or teflon coated liner and to use a larger tip say 1mm for 0.8 wire to allow for expansion (i put it to one side cos i knew it would be something to refer to when i try and have a go) dunno if it works but sounds good!!