Page 129 of 257
Re: 55HG98. Para Recce Rebuild.
Posted: Thu Dec 31, 2015 10:10 am
by AR4412
Thanks David,
I'm hoping to get a little more done at some point today.
Regards,
Re: 55HG98. Para Recce Rebuild.
Posted: Thu Dec 31, 2015 4:57 pm
by AR4412
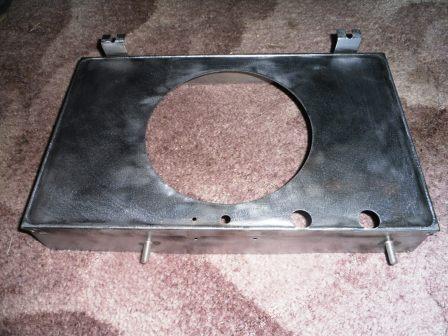
I did a little more to the heater this aternoon. I finished getting most of the paint off the housing, welded in a pair of UNF bolts to replace the snapped studs, and then ground the heads down to ensure clearance between them and the heater matrix.

- SAM_1769.JPG (58.27 KiB) Viewed 1301 times
- SAM_1770.JPG (45.86 KiB) Viewed 1301 times
The only bolts I had new that I could find are a little long, but it won't be a problem to shorten them if I feel the need.
With the bolts welded in, the housing paid a trip to the blast cabinet to get rid of the rust and paint from the recesses before being given a coat of Dinitrol and once that had dried a coat of primer was applied. It's now hanging up to fully dry before it gets it's top coat.
The new springs and catches I ordered for the doors arrived this morning, not bad considering I only ordered them on Tuesday.
Regards,
Re: 55HG98. Para Recce Rebuild.
Posted: Thu Dec 31, 2015 5:05 pm
by AR4412
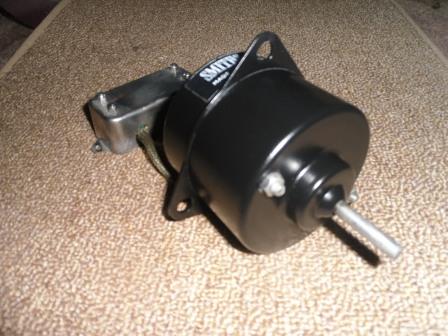
The heater motor also recieved a bit of loving. It has been stripped, cleaned, de-rusted, primed and painted.

- SAM_1771.JPG (63 KiB) Viewed 1300 times
- SAM_1772.JPG (41.74 KiB) Viewed 1300 times
I did in the end paint the fan impellor, I sprayed it with a can of cold gavanising paint to give it a bit of protection. I didn't take another pic of it as the colour didn't change, it's just a bit shinier.
Hopefully I can get the heater's outlet flap panels done over the weekend and then the heater can go back together again.
Regards,
Re: 55HG98. Para Recce Rebuild.
Posted: Thu Dec 31, 2015 5:13 pm
by Gordon Bennett
Hi Neil,
They are all loking really good and good you saved the transfer (unless it is a new one?).
Where did you get the springs & catches from?
The reason i ask, is that the Gunship doesn't have a heater fitted, but i've got one somewhere and can't remember if it has the springs & catches. Might be worth getting a set even if they end up as spares.
Rgds,
Gordon.
Re: 55HG98. Para Recce Rebuild.
Posted: Thu Dec 31, 2015 5:22 pm
by AR4412
Hiya Gordy!

The decal is the original one. I've seen the 12v ones for sale, but haven't stumbled across one for the 24v yet, unless I missed it.
I got the new springs and catches here,
http://www.ebay.co.uk/itm/LAND-ROVER-SE ... 734wt_1190
Regards,
Re: 55HG98. Para Recce Rebuild.
Posted: Thu Dec 31, 2015 5:30 pm
by Gordon Bennett
Hi Neil,
Thanks for swift response

Are these the right knobs? Again i can't check at the moment.
http://www.ebay.co.uk/itm/Landrover-Ser ... XQVERSvug1
Rgds,
Gordon
Re: 55HG98. Para Recce Rebuild.
Posted: Thu Dec 31, 2015 5:59 pm
by Tinweasel
Re: 55HG98. Para Recce Rebuild.
Posted: Thu Dec 31, 2015 7:01 pm
by AR4412
They look like the right ones Gordy. I almost ordered a pair of them when I bought the springs and catches as one of mine is a bit chewed, but I've decided to see what the originals come up like once I chisel the layers of paint off them.
Regards,
Re: 55HG98. Para Recce Rebuild.
Posted: Thu Dec 31, 2015 7:06 pm
by Gordon Bennett
Thanks Guys,
Ordered

Rgds,
Gordon
Re: 55HG98. Para Recce Rebuild.
Posted: Sun Jan 03, 2016 11:17 am
by AR4412
I ordered a pair yesterday as cleaning up the originals revealed them to be cracked, but they'll do for now and the new ones an go into the spares box.
Yesterday also saw the heater casing finished off.

- SAM_1773.JPG (36.92 KiB) Viewed 1206 times
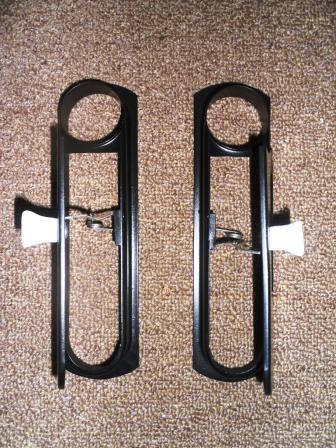
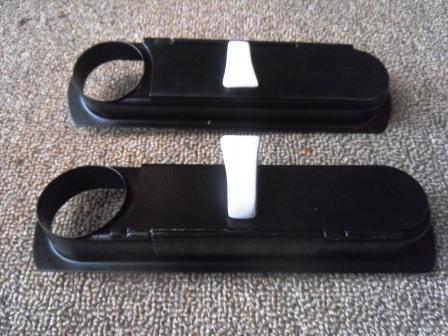
This morning saw the vent panels finished off. They have been stripped bare, de-rusted primed and painted. The original knobs were cleaned of paint and due to being age yellowed were given a lick of gloss white Humbrol model paint before being re-fitted with new springs and catches.
- SAM_1774.JPG (60.61 KiB) Viewed 1206 times
- SAM_1775.JPG (40.75 KiB) Viewed 1206 times
Off now to clean all the hair out of the heater matrix and give that a clean up, then find some small pop rivets for the resistor and cable clip, and the heater can go back together again.
Regards,